Adding data entry controls
So far, our tutorial page does not do anything particularly useful relating to inputting records. Let’s start by replacing our code so far with a data input control. Try replacing all your code between the <body> element and its closing </body> with the following:
<?php
require_once 'client_helpers/data_entry_helper.php';
echo data_entry_helper::date_picker(array(
  'fieldname'=>'sample:date',
  'label'=>'Date'
));
?>
Now we are actually doing something useful, outputting the data_entry_helper class’ date_picker control. When we call a control such as this we generally pass a single associative array as an input parameter, populating this with the options for the control. This is because there are many options for each Indicia client control and most of them can normally be left set to their default value. Therefore having a traditional list of parameters to the method would be extremely unwieldy and using an array of parameters becomes much easier to manage.
Our datepicker example code above illustrates a couple of handy options supported by most of the data entry related controls. The first is the fieldname option which defines the HTML name attribute of the control that the date_picker function produces. If you view the source of your web page you should see this is the case. When we get to as far as submitting our form contents to the warehouse you will learn the fieldname is split into 2 parts separated by the colon. These are
the name of the entity we are saving data to (singular form)
the name of the database field we want to save into
The second handy option in this example is the label which causes a HTML label to be output preceding the actual control.
There is one more thing to learn about at this stage. If you click in the date picker control on your web page and try inputting a date, you’ll see it is just a free text box with no help given for the date format. Not very impressive as it stands, in fact we could probably have just written the HTML for the control in a couple of lines of HTML and saved loading of the client helpers etc. In fact, we’d probably be guilty of misnaming the control because in no sense is this a date picker yet, as you can’t pick dates only type them in. The control is not very impressive simply because we have only output half of the job; most Indicia controls are supported by JavaScript which provides the functionality that runs in the browser itself. In order to include the required JavaScript on the page you need to tell the Indicia client helper code where to put it, using a method called dump_javascript. You can add the following line to the end of your block of PHP code:
echo data_entry_helper::dump_javascript();
This means that your whole code page should look like the following:
<!DOCTYPE html>
<html>
<head>
  <title>Indicia tutorial</title>
</head>
<body>
<?php
  require_once 'client_helpers/data_entry_helper.php';
  echo data_entry_helper::date_picker(array(
    'fieldname'=>'sample:date',
    'label'=>'Date'
  ));
  echo data_entry_helper::dump_javascript();
?>
</body>
</html>
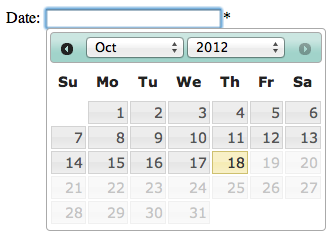
Now, save the code file and reload the page in your browser. This time, when you click in the date picker you will see a drop down date picker. Note that our version of the date picker only allows dates in the past to be picked as records cannot be in the future.
That’s quite a lot of functionality for not very much code and don’t forget, there is also support for validation, saving and reloading values to the database all built into the control we’ve just added to the page.